Dry aging steak is something premium steakhouses rely on for quality meals for customers. But did you know you can actually complete the process of dry aging steak? With the right tools (and some time), you can pull off this flavor-boosting process at home, and the results are worth the wait. We’re talking bold, beefy, steakhouse-level taste that’ll make your usual ribeye seem a little, well, underdressed. This guide breaks down everything you need to know about dry aging, from its benefits to expert tips and tricks for the best results.
What Is Dry Aging?
Dry aging is the process of storing large cuts of beef in a controlled, refrigerated environment for several weeks. During this time, the meat is exposed to air, which causes moisture to evaporate from the surface while natural enzymes begin to break down muscle fibers. The result is a firmer texture outside but more tender meat inside and a darker exterior. Once you complete the aging process, you trim away the dried outer layer to reveal the perfectly aged steak that’s ready to cook.
The Purpose of Dry Aging
They say things get better with age, and that’s highly true for steaks. Dry aging concentrates and enhances the natural flavor of beef while improving its texture. As the meat ages, moisture loss intensifies its natural beefy taste, and enzymes naturally present in the meat begin to tenderize it from the inside out. This process gives dry-aged steak its signature depth of flavor and refined texture that you can’t typically get from a fresh cut, even when it’s a high-quality cut.
The Benefits of Dry Aging
Dry aging improves both the flavor and texture of beef by allowing time and controlled conditions to change the meat at a structural and chemical level. In other words, there’s a lot of science going on behind the scenes of dry aging that simply makes steak better all around. Here are the key benefits:
- More intense flavor: As steak loses moisture during dry aging, its natural flavors concentrate to create a strong, savory flavor profile.
- Better tenderness: Natural enzymes break down connective tissue during the dry aging process, resulting in meat that’s easier to chew but still with the tell-tale firmness and structure that steak should have.
- Enhanced crust formation: A dry, outer layer forms during aging. Once you trim it after aging completes, the steak ends up with a clean surface that sears well and locks in flavor.
Selecting the Kind Of Steak to Age
Not all cuts are ideal for dry aging. To get the best results, you need a large, bone-in, well-marbled piece of beef. Smaller cuts tend to dry out too quickly and don’t develop the same flavor or texture benefits. Typically, full subprimal cuts, like bone-in ribeye, strip loin, or top sirloin, are excellent choices.
Also, pay attention to the quality of the steak you choose. High-quality beef yields better results, as your dry-aged steak will have a solid foundation to build upon. Look for beef graded Choice or Prime, since marbling, or intramuscular fat, plays a big role in both flavor and moisture retention during the aging process. Avoid individual steaks or anything pre-trimmed; dry aging is meant for whole sections that you can cut later. Once aged, you’ll slice off the exterior and portion the steaks yourself.
How Long Does Steak Take to Age?
Steaks are commonly aged anywhere from two weeks to two months. Generally, somewhere between 21 to 45 days is most common. For reference, we age our steaks at Chicago Steak Company from 28 to 40 days. At 21 days, you’ll usually notice a difference in tenderness. Around the 28-day mark is when flavor becomes deeper and more complex. Dry aging for longer than 40 days produces stronger flavors, which, for some people, leads to a little too much of an earthy flavor. We find that the 28-40-day zone is ideal for aged steaks that balance rich flavor and broad appeal.
The Dry Aging Setup
To dry age steak at home, you’ll need a dedicated mini fridge or aging fridge that allows for good airflow. Wire racks are best, as they allow air to hit all sides of the steak. You should also consider using a small fan that fits inside the fridge to help circulate the air. Make sure the fan’s cord can be outside the fridge to plug in without interfering with the fridge seal.
Next, make sure you maintain a humidity level of around 80% inside the fridge. If your fridge is staying at a lower humidity, place a small bowl of salted water inside to help raise it gradually. If the humidity is too high, reduce moisture by opening the door briefly once a day or adding a moisture absorber like baking soda or a desiccant pack.
Finally, use a thermometer inside the fridge to monitor its temperature at all times. Set the fridge’s temperature to 34–38°F, but check your thermometer each day to make sure it stays within that window.
The Do’s and Don’ts of Dry Aging
Here are some important points to keep in mind before dry aging steak.
Do:
- Label your start date so you can track aging time accurately.
- Keep the fridge clean and sanitize surfaces before aging.
- Rotate the meat every few days to ensure even airflow.
- Use a UV light or antibacterial bulb if available to help prevent unwanted mold.
Don’t:
- Age multiple cuts together in a small space. They need plenty of airflow on all sides.
- Cover the meat in plastic wrap or foil.
- Season or marinate the meat before aging.
- Leave the refrigerator door open for too long, which can cause the internal temperature to rise.
- Ignore strange odors; sour or rotten smells mean something went wrong.
- Rush it. Dry aging takes time to develop flavor.
How to Cook Aged Steak
You can generally cook a dry-aged steak as you normally would cook steak, whether that’s on the grill, seared in a pan, or using the reverse-sear method. Whatever way you choose, salt the steak generously and allow it to sit at room temperature for 30-45 minutes before cooking it. The steak’s temperature will rise slightly during this time, which helps it cook more evenly from the inside out. Salting it beforehand helps the steak retain its moisture and become more tender when cooking.
Remove the steak from the heat when it’s about five degrees lower than your target temperature. When you’re finished cooking, rest the steak at room temperature again, but this time only for 5-10 minutes. Steak continues to cook a bit here, bringing it up to your desired temperature, and it reabsorbs natural juices it would otherwise lose if you cut it too soon.
Conclusion
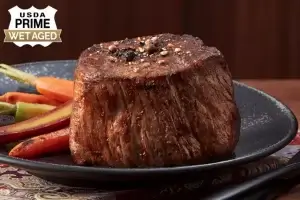
While you can certainly dry age steak yourself (this guide is proof!) you don’t necessarily have to take on this responsibility or invest in dry-aging equipment. Instead, you can shop our USDA Prime dry-aged steaks, including strip steak, filet mignon, and ribeye, for convenient at-home delivery. Our dry-aged steaks are aged to perfection in our state-of-the-art dry-aging facility, ensuring exceptional quality and flavor.